How to Install a Farmhouse Sink: The Ultimate Step-by-Step Guide

Installing a farmhouse sink can instantly add charm and functionality to your kitchen. Known for their deep basins and classic apron fronts, farmhouse sinks are both stylish and practical. Whether you’re renovating your entire kitchen or just looking to upgrade your sink, this guide will help you through the process. While the installation may seem daunting, with a little patience and the right tools, you can achieve a beautiful result.

Farmhouse sinks, also known as apron-front sinks, are designed to be both visually appealing and highly functional. They offer ample space for washing large pots and pans, making them a favorite among home chefs. Additionally, their distinctive front panel adds a touch of rustic elegance to any kitchen design. However, installing a farmhouse sink can be a bit more involved than installing a standard drop-in sink. It requires some modifications to your countertop and cabinetry, but the end result is well worth the effort.
In this post, we’ll walk you through the entire installation process, from gathering the necessary supplies to the final touches. We’ll also share some valuable tips and tricks to ensure a smooth installation and answer some common questions you might have. Ready to give your kitchen a stylish upgrade? Let’s get started!
Supplies You’ll Need to Install a Farmhouse Sink
- Farmhouse sink
- Sink installation kit (brackets, screws)
- Silicone sealant
- Jigsaw or reciprocating saw
- Tape measure
- Level
- Screwdriver or drill
- Pipe wrench
- Plumber’s putty
- Bucket (for catching water from drain pipes)
- Towels or rags
- Sandpaper or file (for smoothing cut edges)
Instructions for Easy Installation
- Prepare the Area. Turn off the water supply and disconnect the plumbing under your current sink. Place a bucket under the drain to catch any water. Remove the old sink and clean the area.
- Measure and Mark. Measure the dimensions of your farmhouse sink and mark the cut lines on your countertop and cabinetry. Ensure the sink will fit snugly into the space.
- Cut the Countertop. Using a jigsaw or reciprocating saw, carefully cut along the marked lines on your countertop. Smooth any rough edges with sandpaper or a file.
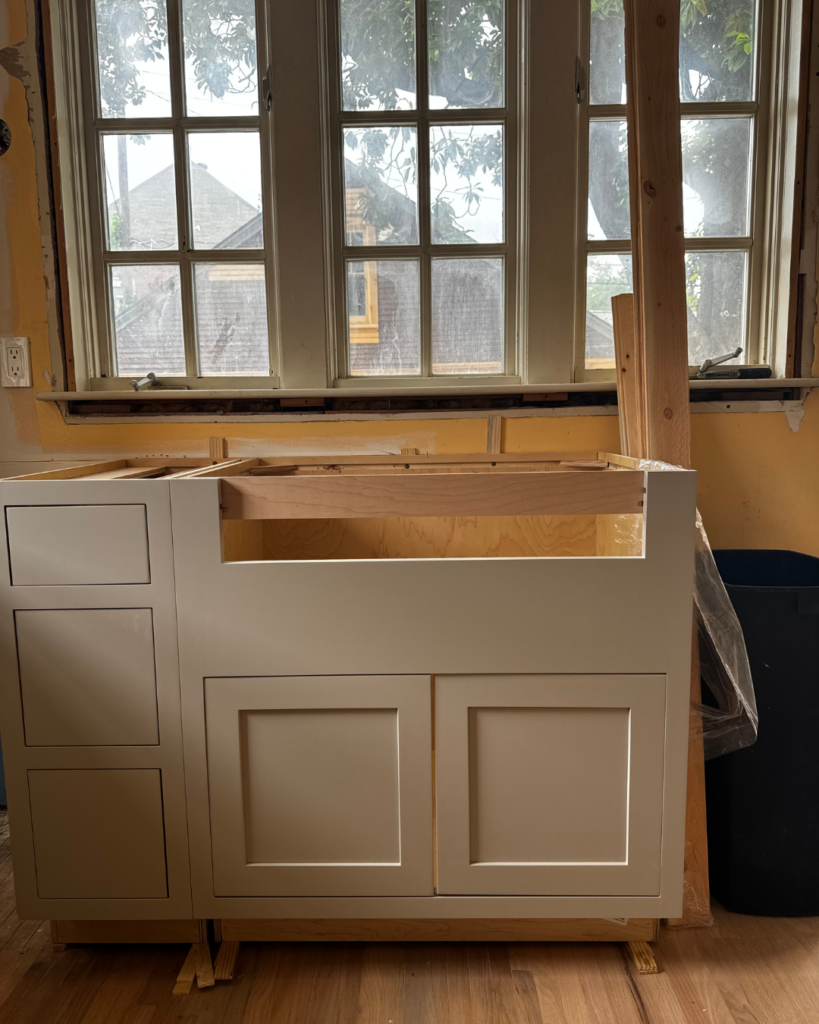
- Modify the Cabinet. Farmhouse sinks typically require modifications to the front of the cabinet. Remove the cabinet’s front panel and cut an opening to accommodate the sink’s apron front.
- Install Supports. Install support brackets or a support frame inside the cabinet to hold the weight of the sink. Make sure the supports are level and secure.
- Place the Sink. Apply silicone sealant to the edges of the sink cutout. Carefully lower the farmhouse sink into place, ensuring it sits level and flush with the countertop.
- Secure the Sink. Attach the sink to the support brackets using screws and the installation kit provided. Ensure the sink is firmly secured and won’t shift.
- Reconnect Plumbing. Reconnect the plumbing, including the drain pipes and water supply lines. Apply plumber’s putty to the drain fittings to prevent leaks.
- Seal the Edges. Apply a bead of silicone sealant around the edges of the sink where it meets the countertop to prevent water from seeping underneath.
- Final Check. Turn on the water supply and check for leaks. Adjust the plumbing connections if necessary and wipe away any excess sealant.

Tips and Tricks
- Double-Check Measurements! Measure twice, cut once. Ensure all dimensions are accurate before making any cuts.
- Use a Template. Many farmhouse sinks come with a template for cutting the countertop. Use it for precise cuts.
- Support Weight. Farmhouse sinks are heavy, so ensure your cabinet can support the weight by adding extra bracing if needed.
- Seal Properly. Apply enough silicone sealant to create a watertight seal around the sink.
- Work with a Partner. Having an extra set of hands is definitely needed to help with lifting and positioning the heavy sink.
Can I install a farmhouse sink in existing cabinets?
Yes, you can install a farmhouse sink in existing cabinets, but it requires some modifications. Farmhouse sinks are typically deeper and have a front apron that extends past the cabinetry, so you will need to cut the front of the cabinet to accommodate this design. Additionally, you may need to reinforce the cabinet to support the weight of the sink, which is usually heavier than standard sinks. With careful measuring, cutting, and the right tools, you can retrofit your existing cabinets to fit a farmhouse sink, transforming your kitchen with a stylish and functional centerpiece.
How do I cut the countertop for a farmhouse sink?
Cutting the countertop for a farmhouse sink involves precise measuring and careful cutting to ensure a perfect fit. First, measure the dimensions of your sink, including the depth, width, and length. Mark these measurements on your countertop, ensuring the cutout is centered over the cabinet opening. Using a jigsaw or reciprocating saw, carefully cut along the marked lines. It’s essential to cut slowly and steadily to maintain clean edges. If your sink comes with a template, use it to guide your cuts for accuracy. Once the cutout is complete, smooth any rough edges with sandpaper or a file to prepare for sink installation.
Leave a Reply
I create some affiliate links through the Amazon Influencer program and the LTK platform. Because of this, I have the ability to earn small commissions from some purchases that you make while using my links (at no cost to you!). I so appreciate your support.